Tips For Painting Internal Doors
Do you need help with painting doors in your property? Read our tips which will make the job quick, safe and easy for you.
Preparation is key and if you prepare and follow our tips you will end up with upcycled, beautiful new looking doors and you will have saved yourself a lot of money replacing them.
You can attain a perfect, long-lasting finish if you prepare adequately, use the right tools and supplies, and use a good technique. Make an old door look brand new again with these expert tips.
Choose Your Interior Door Paint Colour
There are many factors to consider when choosing an interior door paint colour. The first is the overall aesthetic of your home. If you have a modern home, you’ll want to choose a colour that complements your contemporary style. For a traditional home, you might want to choose a more classic colour like white or cream. The second factor to consider is the trim in your home. If you have dark wood trim, you may want to choose a light-coloured door to ensure it doesn’t look too dark and heavy. Conversely, if you have light-coloured trim, you can get away with a darker door colour, it really does depend on the look you are trying to achieve. Finally, think about the colours of the rooms adjacent to your doors as you don’t want colours to clash within your home and will want to choose a colour that works well with all of them.
When deciding on your door colour try using Pinterest for ideas and looks you might want to achieve. A light-coloured door will help a room look light and airy whilst a dark-coloured door or doors will create drama and depth.
Depending on the finish of your doors you don’t always have to paint over paint, you could always strip them back to their original surface and varnish, oil or wax them or some old doors may have been painted so much that they need to be stripped back.
Eco Solutions Home Strip Paint Remover is a safe and environmentally product that will help you quickly and safely strip your doors back to their original material. Simply paste or spray it on, leave it to work for 20 minutes plus and then wipe away the paint you no longer want. If there are lots of layers of paint you may need to do it a couple of times or alternatively use a flat-edged scraper to scrape away the old paint layers.
If you decide your doors don’t have too many layers of paint or varnish and you’re happy to give them a coat of paint over the top then our Painters’ prep product is easy to use and perfect for the job. Spray it on, leave it to work and then wipe away all the grime and dirt from the previous years. This leaves your door prepared and ready to paint the colour you want to make them look brand new again.
A great tip is to choose your colour and buy, and try a tester first before you embark on your whole door painting journey. You don’t want to halfway through and decide you don’t like the colour you’ve chosen.
Collect Your Paint Supplies
In order to paint like a pro and end up with a professional finish, you will need to invest in some quality painting tools. This doesn’t mean that you need to spend a fortune on the latest and greatest products, but you should look for brushes and other supplies that are durable and will last through multiple projects. Nylon or polyester brushes are ideal for most types of paint, while natural bristle brushes are better suited for oil-based paints. You will also need a variety of sizes to get the job done right, so don’t skimp on this essential part of your painting arsenal.
As far as other supplies go, painter’s tape is an absolute necessity when doing any type of trim work. A good dust sheet/cloth is also vital in order to protect floors and furniture from drips and spills. Lastly, be sure to have plenty of old rags on hand, old t-shirts or bed sheets are great to use to wipe up any mess or spills along the way.
With these basics in place, you will be well on your way to achieving professional-looking results with your next job of painting doors.
Prepare For Painting Doors
If your door is new, you may not need to do much prep work before painting. If it’s an old door, however, you’ll want to use the products we’ve detailed above and then you may need to sand away any rough spots and fill in any holes or cracks with wood filler. Once that’s dry, give the entire door a light sanding and this will help the paint adhere better and create a smoother finish.
If you’re planning on painting doors a darker colour, you may also want to prime it first. This will help ensure even coverage and prevent the underlying wood from showing through. Simply apply a layer of primer with a brush or roller and let it dry completely before proceeding to paint.
Regardless of whether or not you prime first, be sure to use paint that’s formulated for doors and trim. This type of paint has a higher resin content, which makes it more durable and resistant to chips and scratches. It can also withstand repeated cleaning without losing its lustre.
Always follow the paint, oil or varnish instructions before you start painting doors as each make and type of product will have different directions.
As well as ensuring the doors are well coated with your new paint, varnish or oil, it’s important to take measures to protect them from sticking which will damage the paint job you will have just done. This can be done by lubricating the door hinges and providing a buffer between the door and the frame and we would advise that you do this before you start painting, varnishing or oiling.
An easy way to lubricate, protect and keep your door hinges in good working order is to apply a small amount of WD40 before you start painting. This will help keep the hinge moving smoothly and prevent any sticking. Open and close the doors several times and then use a damp cloth to wipe away the excess product. Then use your Grime Go again, which will ensure all of the oil has gone to ensure your paint, varnish or oil sticks to the surface of the door as it should do.
To provide a buffer between the door and the frame, you can always place strips of felt or weather stripping along the edge of the door. This will create a snug fit that will help prevent sticking. You can also use rubber or foam insulation if you have it on hand. Both of these are also great for preventing draughts and cold air coming through which is a huge benefit.
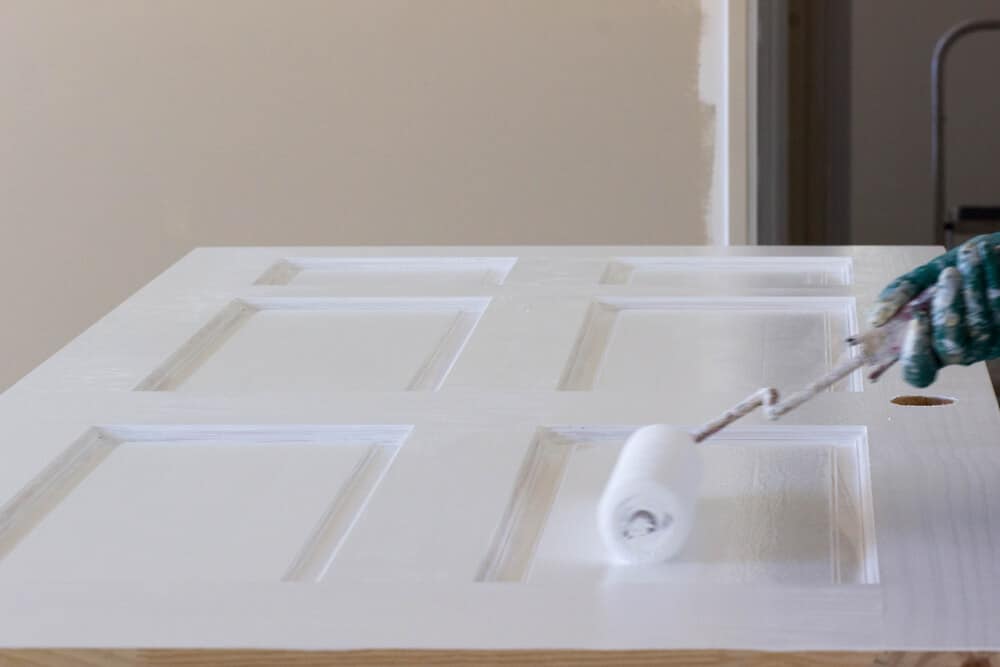
 How To Paint Your New Panelled Door
After you’ve installed your new panelled door, it’s time to paint it. But before you start, there’s a certain order you should follow to ensure the best results. Here’s what you need to do:
- Start by painting the moulding around the door first. This will give you a nice, clean line to work with and make sure that any paint that gets onto the door itself is easy to clean up
- Once the moulding is painted, move on to painting the panels themselves. Work from top to bottom and be sure to get into all of the nooks and crannies. Use a small brush for this step if necessary
- Finally, paint the frame of the door itself. Start at the top and work your way down, making sure that you cover all sides evenly.
Painting An Existing Door
Once you’ve stripped and cleaned the door you should lightly sand it. This will help to smooth out any imperfections in the surface and give the new coat of paint a good foundation to adhere to. Once the door is sanded, be sure to wipe it clean and vacuum up all of the dust before proceeding to the next step.
You then need to decide if you should use a primer and this will depend on the paint you are using. Some let you know you need one and some you don’t so always check the instructions on the tin before you buy so you know what you need and what you need to do. If you need to use a primer ensure you allow it to dry completely before proceeding with the painting.
Remember, when choosing a paint colour, keep in mind that light colours will make a room feel larger and airier, whilst dark colours can make a space feel more dramatic and even cosier.
When you are considering painting doors you should decide whether you want a glossy or matte finish for your doors. Glossy finishes are easy to clean but can show imperfections more easily, whilst matte finishes tend to hide imperfections better but can be more difficult to clean.
Keep Newly Painted Doors Smooth And Sleek
After you’ve applied a fresh coat of paint, varnish or oil to your doors, leave them to dry completely and always as per the manufacturer’s instructions. Try not to use them or touch them until they are completely dry. When the paint has fully dried you may decide you want to give them a second or even third coat. This is a daunting process but whilst you’ve started it you’re better to finish the job properly otherwise you’ll forever look at them and think you should have given them another coat.
Painting Doors Summary
When it comes to painting doors at home, there are a few things you should keep in mind. Firstly, if the door is made of wood, be sure to prepare it well before painting. This includes using the Eco Solutions products and light sand. This will help the paint adhere and give you a smoother and more perfect finish. Secondly, always use a good quality paint brush, this will make a big difference in the final result and mean you don’t have loose paint brush hairs dry in your paint, varnish or oil. And finally, take your time. Painting doors is not a quick job, but taking the time to do it right will pay off in the end. Start with 1-3 doors first and see how you get on, you are bound to learn loads from your first attempt and if you start to do the whole house it can get a bit daunting and demoralising.
You can find a full list of stockists for our safe, water-based, environmentally friendly products here.